Rat RIg Universal CNC Electronics Enclosure
The Rat Rig Universal Electronics Enclosure was designed with plenty of room to house the electronics of any CNC machine, from Rat Rig or not!
Compatible with the Rat Rig preset beginner, intermediate, and advanced electronic bundles, it features pre-drilled mounting points for popular controllers like Rodent, AXBB, Scylla, and Flexi-HAL controller boards.
BOM
Bellow you will find the BOM spreadsheet for the Universal CNC Electronics Enclosure.
Files
Panels (included in the kit)
Printed parts
Check our github to get access to STL files for all printed parts. All files are provided in the correct orientation for printing on a standard FDM 3D printer. In general the printed parts are quite forgiving, but are also quite large. If you suffer from drafts and/or poor bed adhesion you may need to use brims/rafts for some parts to prevent warping.The following table shows the recommended print settings when printing any of the parts provided.
Print Settings:
- Perimeters
- 4
- Line Width
- 0.45mm
- Layer height
- 0.2 - 0.3 mm
- Infill
- 25%
- Supports
- None
Universal cnc electronics enclosure CAD
CAD model for the Universal CNC Electronics Enclosure is made available via the Rat Rig Fusion 360 online viewer.
Choose a model to enable the download button below.
UCEE Empty
arrow_forward
UCEE with DIN rails
arrow_forward
UCEE Intermediate electronics
arrow_forward
UCEE Advanced electronics
arrow_forward
Assembly Guide
Step-by-step mechanical assembly guide, electronics bundle and machine connections for the Universal CNC Electronics Enclosure Kit. Click on the button:
CNC Universal Electronics EnclosureMains Power
This guide covers the AC wiring for the UCEE,
Before proceeding with any AC 230V wire connections, it is crucial to understand the risks involved. Alternating Current (AC) at 230V / 110V is a high voltage that can cause severe injury or even death if not handled correctly. This type of electrical work is highly dangerous and should only be performed by a licensed professional.By using this guide, you acknowledge the following:
Rat Rig CNC machines - firmware
Here, you will find all the configurations and instructions needed to get your machine operational with the firmware we officially support, such as FluidNC for the Rodent controller (GrblHAL coming soon) and UCCNC for the AXBB controller.
Select your firware of choice:
rodent Controller

GrblHAL (Soon)

AXBB-E

Fluid NC
FluidNC is a CNC firmware optimized for the ESP32 controller. It is the next generation of firmware from the creators of Grbl_ESP32. It includes a web based UI and the flexibility to operate to a wide variety of machine types.
configuration Guide
A step-by-step configuration guide is now available. It covers the installation of FluidNC on the Rodent board.
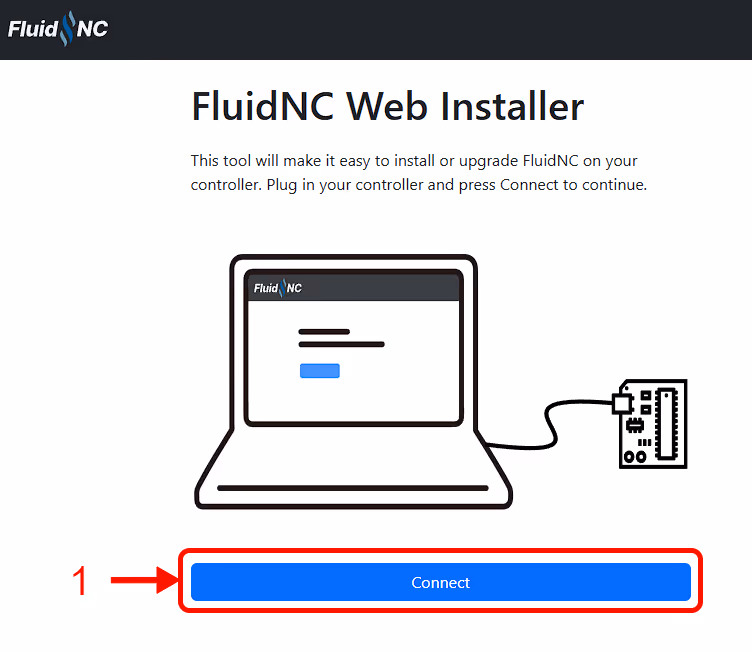
Start by connecting the Rodent via USB to your computer.
Go to the FluidNC web configuration tool - click here.
Click on the connect button (1). Your browser will ask permition to connect via USB Serial to the right COM port, allow it.
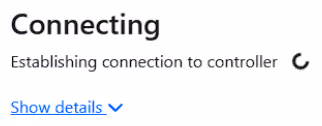
If the right COM port is selected, the browser will start establishing connection to the controller.
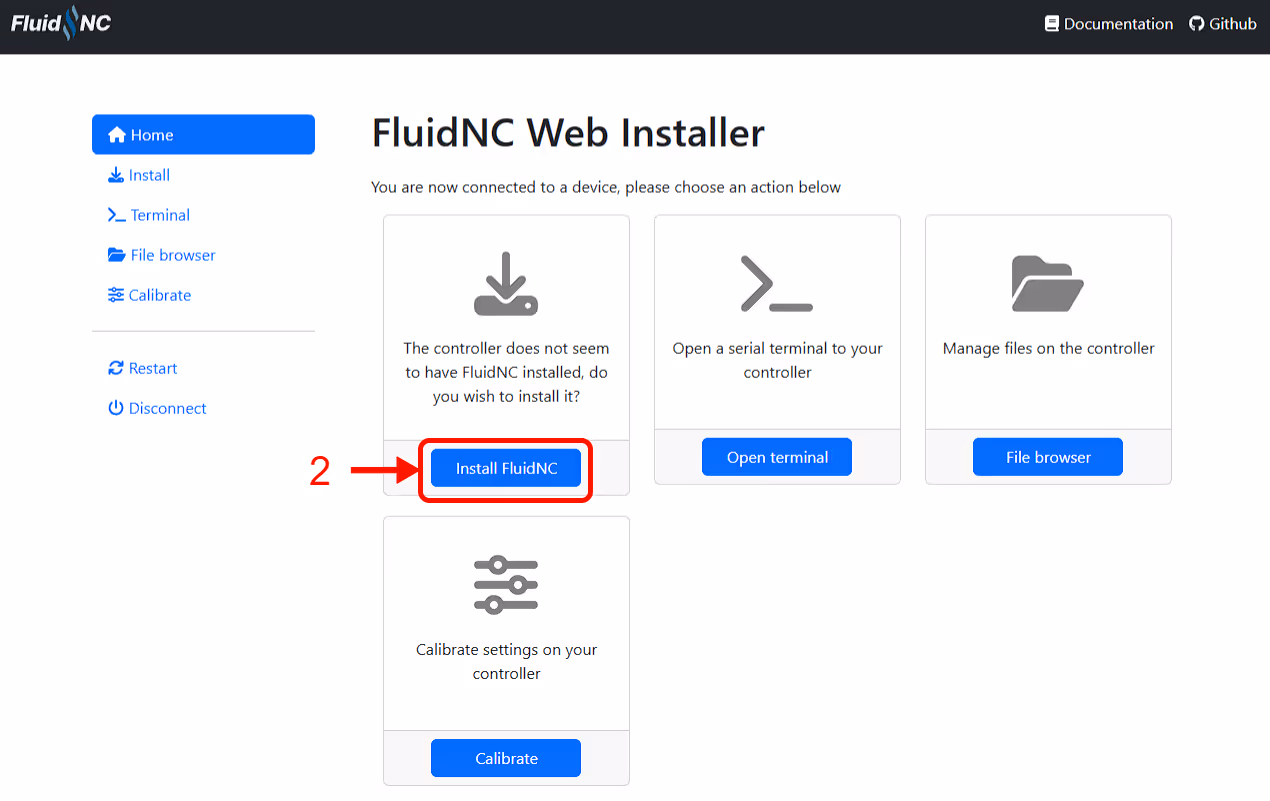
As soon as the connection is established, you will access the FluidNC installer tool. Proceed to click "Install FluidNC" (2), as shown below:
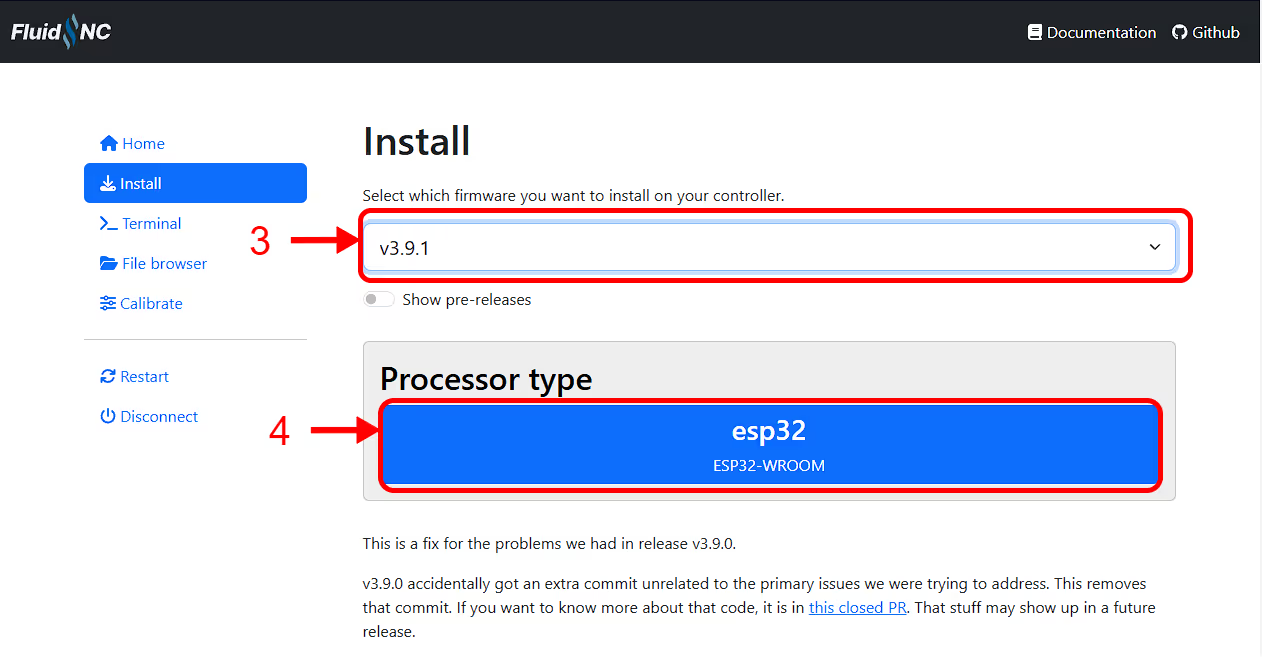
Ensure the latest official release is selected (3), then click the blue button to install FluidNC on your controller (4).
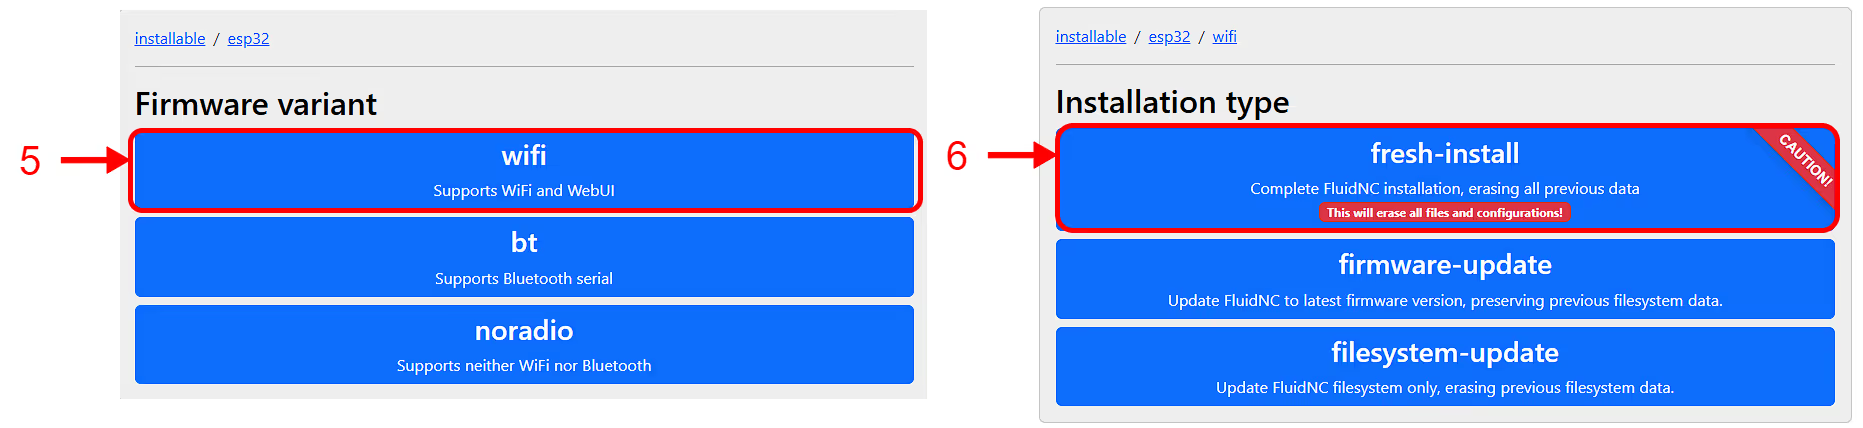
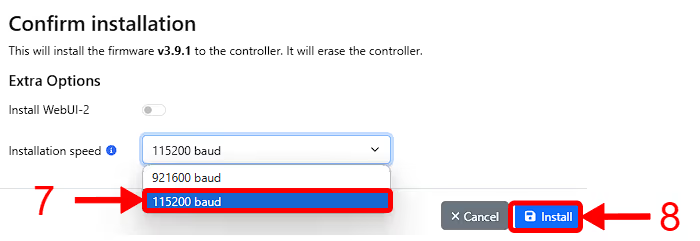
Click "wifi" (5) followed by "fresh-install" (6), then select the 115200 baud option (7) and finally click "install" (8).
FluidNC will be installed on your controller, wait for the installer to finish to click "continue" (9).

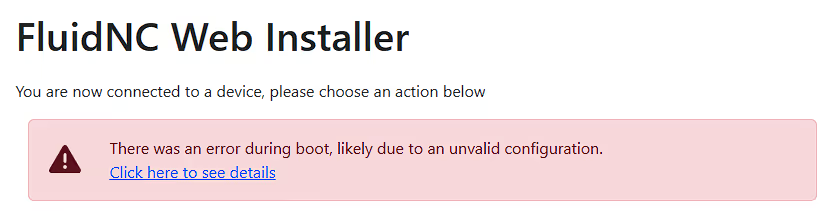
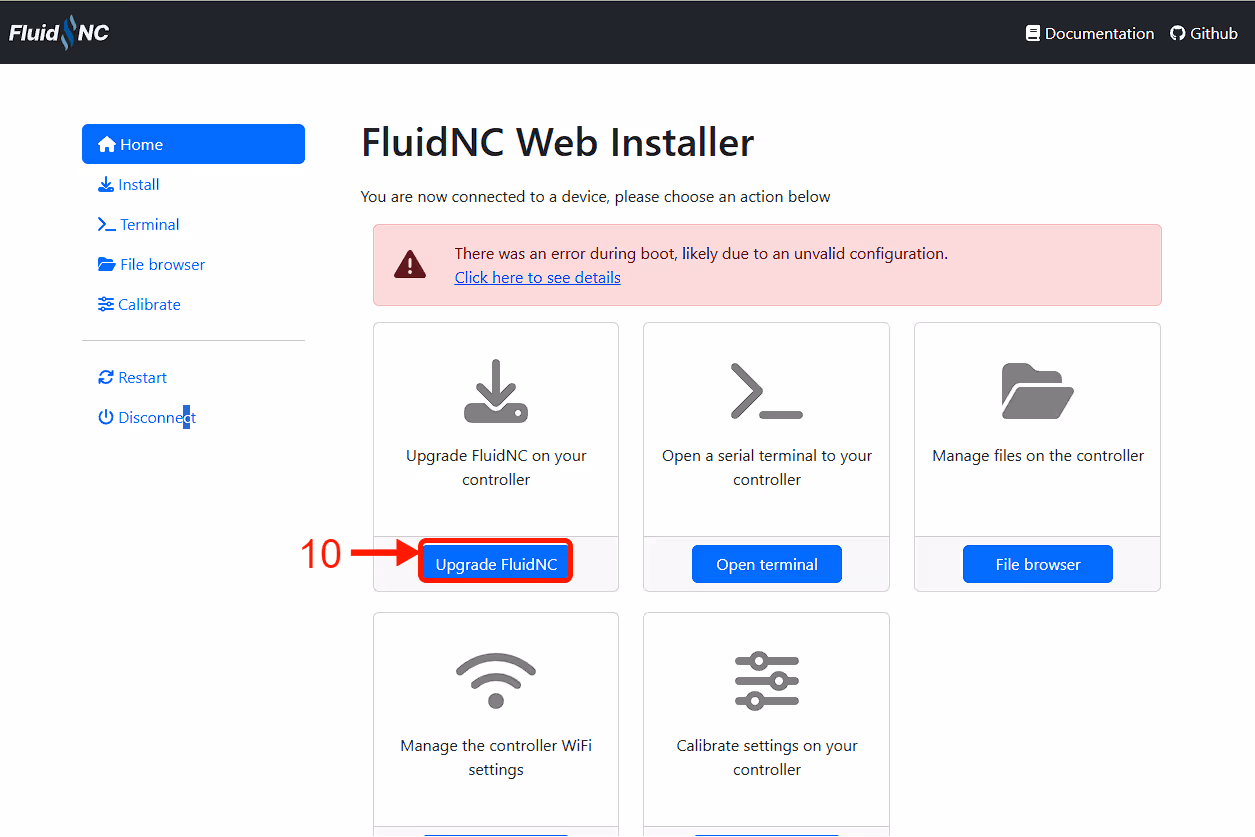
An Error will appear, stating that FluidNC wasn't able to find a config, we'll upload it on the next steps.
Click on the "Upgrade FluidNC" button (10).
StrongHold ONE [750x750] - Click Here
StrongHold ONE [750x1250] - Click Here
StrongHold ONE [1250x1250] - Click Here
StrongHold PRO [1000x1000] - Click Here
StrongHold PRO [1000x1500] - Click Here
StrongHold PRO [1500x1500] - Click Here
Mill - Click Here
Click on the "upload" button (11) and upload the correct file:
Then check if the new config file is "active" (12)
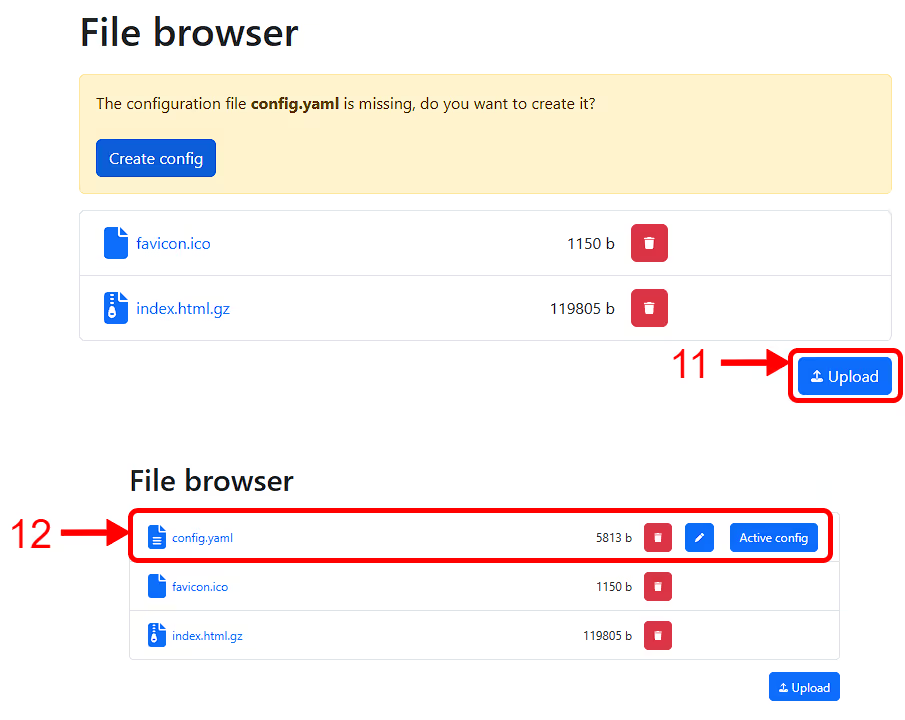
If you have any config erro, reboot the board, the error should go away.
Navigate to the "wifi" (13) page and fill all the details with your network if you desire. Also fill the Access point settings, as the Rodent will use it's own wifi if it fails to connect.

Reboot the board and acess it via your browser RatRigMill.local
UCCNC
how to install UCCNC
Installation:
- To install the license key simply UNZIP and copy the files you will receive to the UCCNC directory, connect your UC100/UC300/UC300ETH/UC400ETH/AXBB-E motion controller to the USB/ethernet port and run the software*.
- License key: after buying a license key, please reply to your order confirmation e-mail with the serial number of your controller. We will provide you with the correct key for that specific serial number.
- The latest software version you may always download and reach on the following webpage: https://cncdrive.com/UCCNC.html
- Also please feel free to register and post on the CNCDrive forum at https://forum.cncdrive.com
- If you need customer support about the software then email: support@cncdrive.com
* Please note that the UCCNC software is licensed per motion controller. One license key works with one motion controller only. The license keys are tied to the serial numbers of the motion controllers and are not tied to the computer in any ways which means that the license keys can be installed on any number of computers.
User's Manual and Video tutorials:
For info on the software, download the User's manual, or access video tutorials please visit: https://cncdrive.com/UCCNC.html
Download your machine profile
Download your machine profile from the list below:
StrongHold ONE [750x750] - Click Here
StrongHold ONE [750x1250] - Click Here
StrongHold ONE [1250x1250] - Click Here
StrongHold PRO [1000x1000] - Click Here
StrongHold PRO [1000x1500] - Click Here
StrongHold PRO [1500x1500] - Click Here
Mill - Click Here
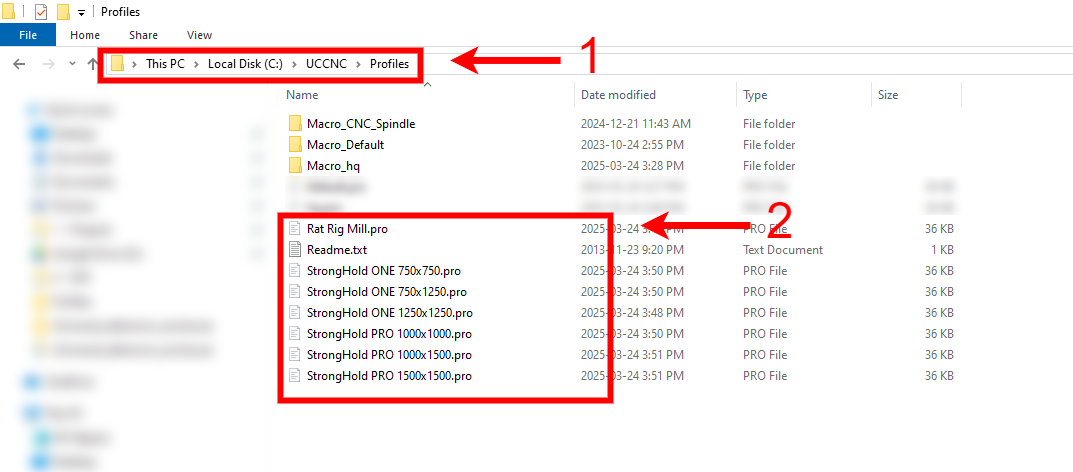
Navigate to the folder where UCCNC is located, find the "profiles" folder (1), then drop your machine profile inside this folder (2).
Open UCCNC, click on the "settings" tab (3), follow with "profiles" (4). Select your profile on the central window (5) and lastly click on "Load Profile" (6).
