Docs
  • CNC machines
    Stronghold pro
    Stronghold One
    Rat RIg mill
    compact cnc electronics
    universal cnc electronics
  • 3D Printers
    V-Core 4.0
    V-Core 3.1
    V-Minion
    V-chonk
  • Structural
    Workbenches
    Enclosures
    Mill Enclosure
  • lab
    ModsUpcomingNon-CommercialLegacyCAD-Library
  • Community
UCEE
Shop Now
Project Details
BUild
BomFIles
BUild GUide
MechanicalElectronicsFirmware

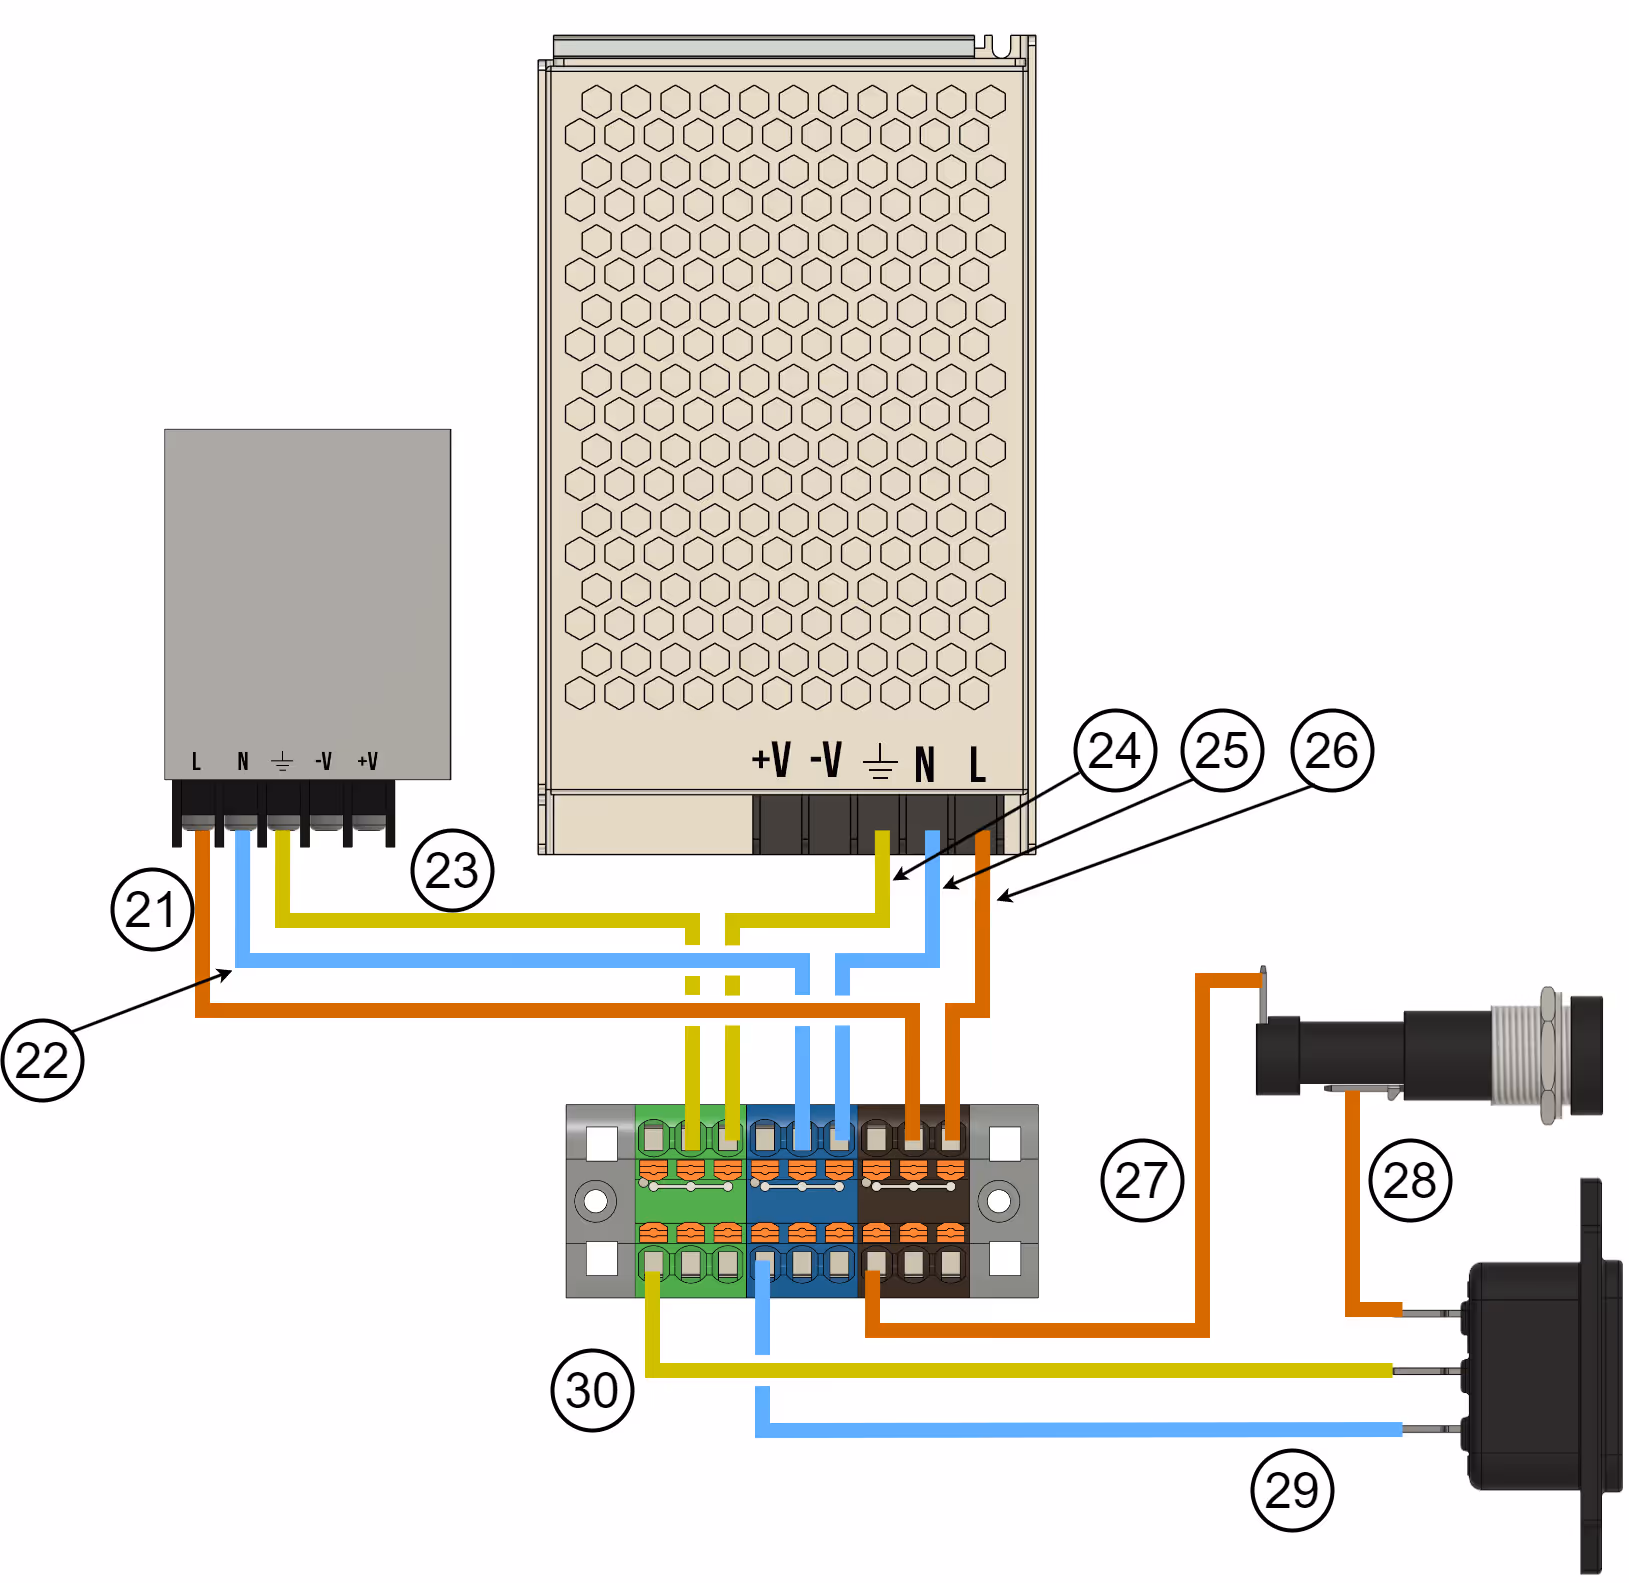
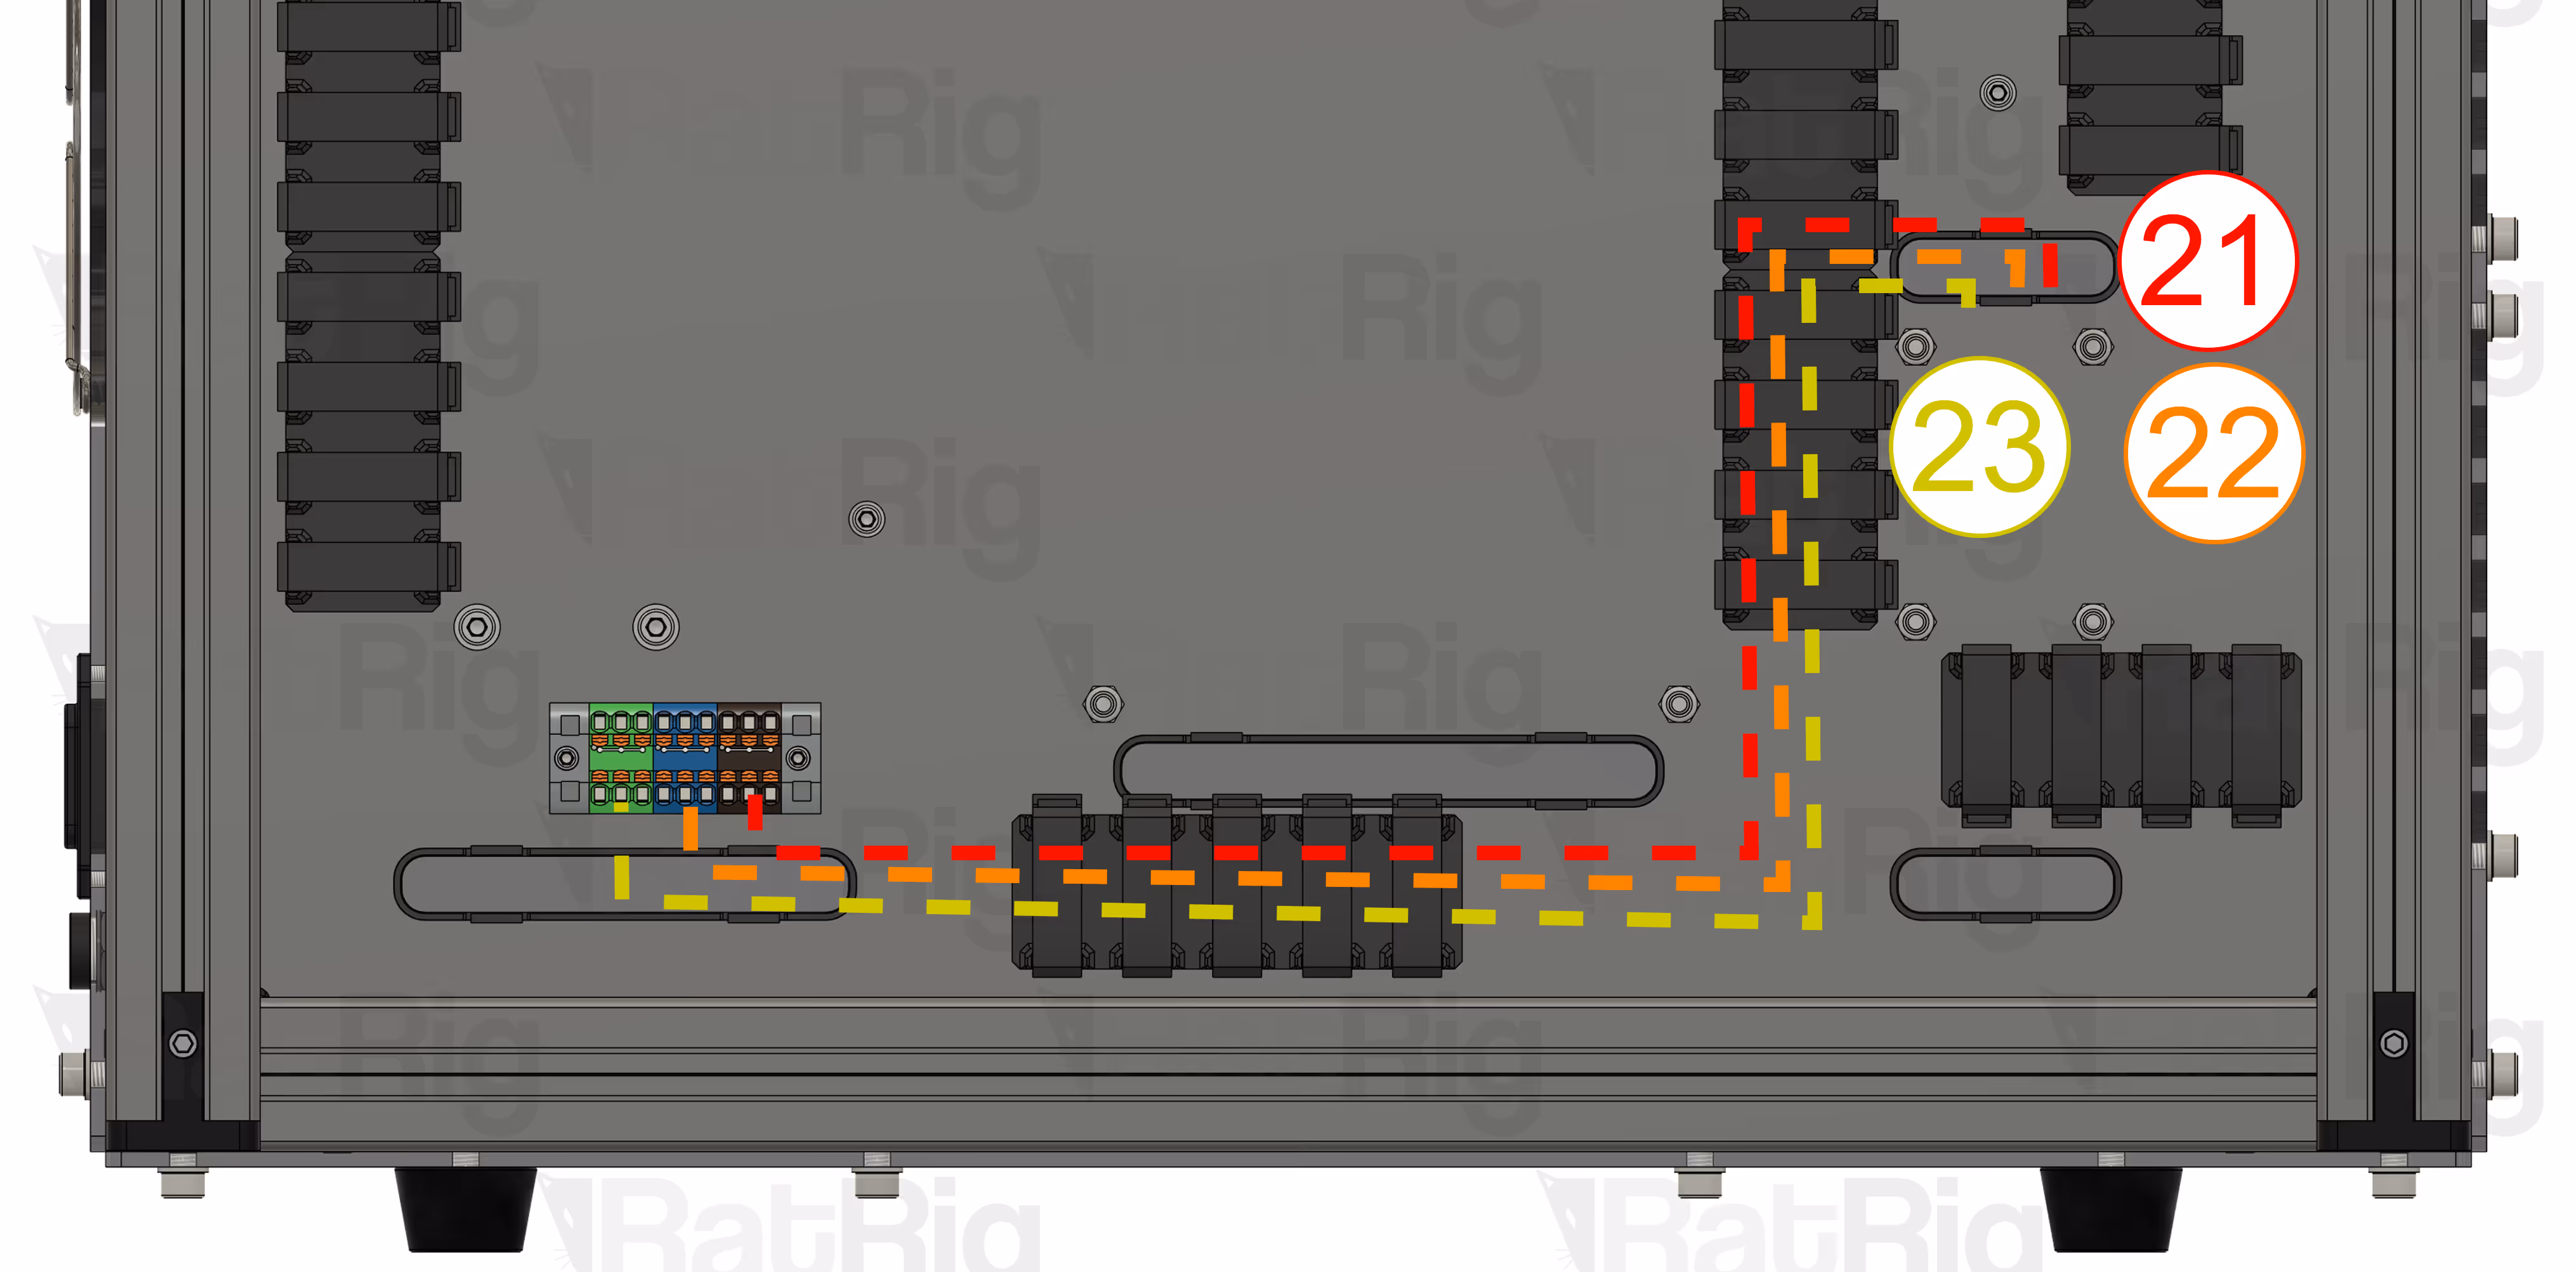
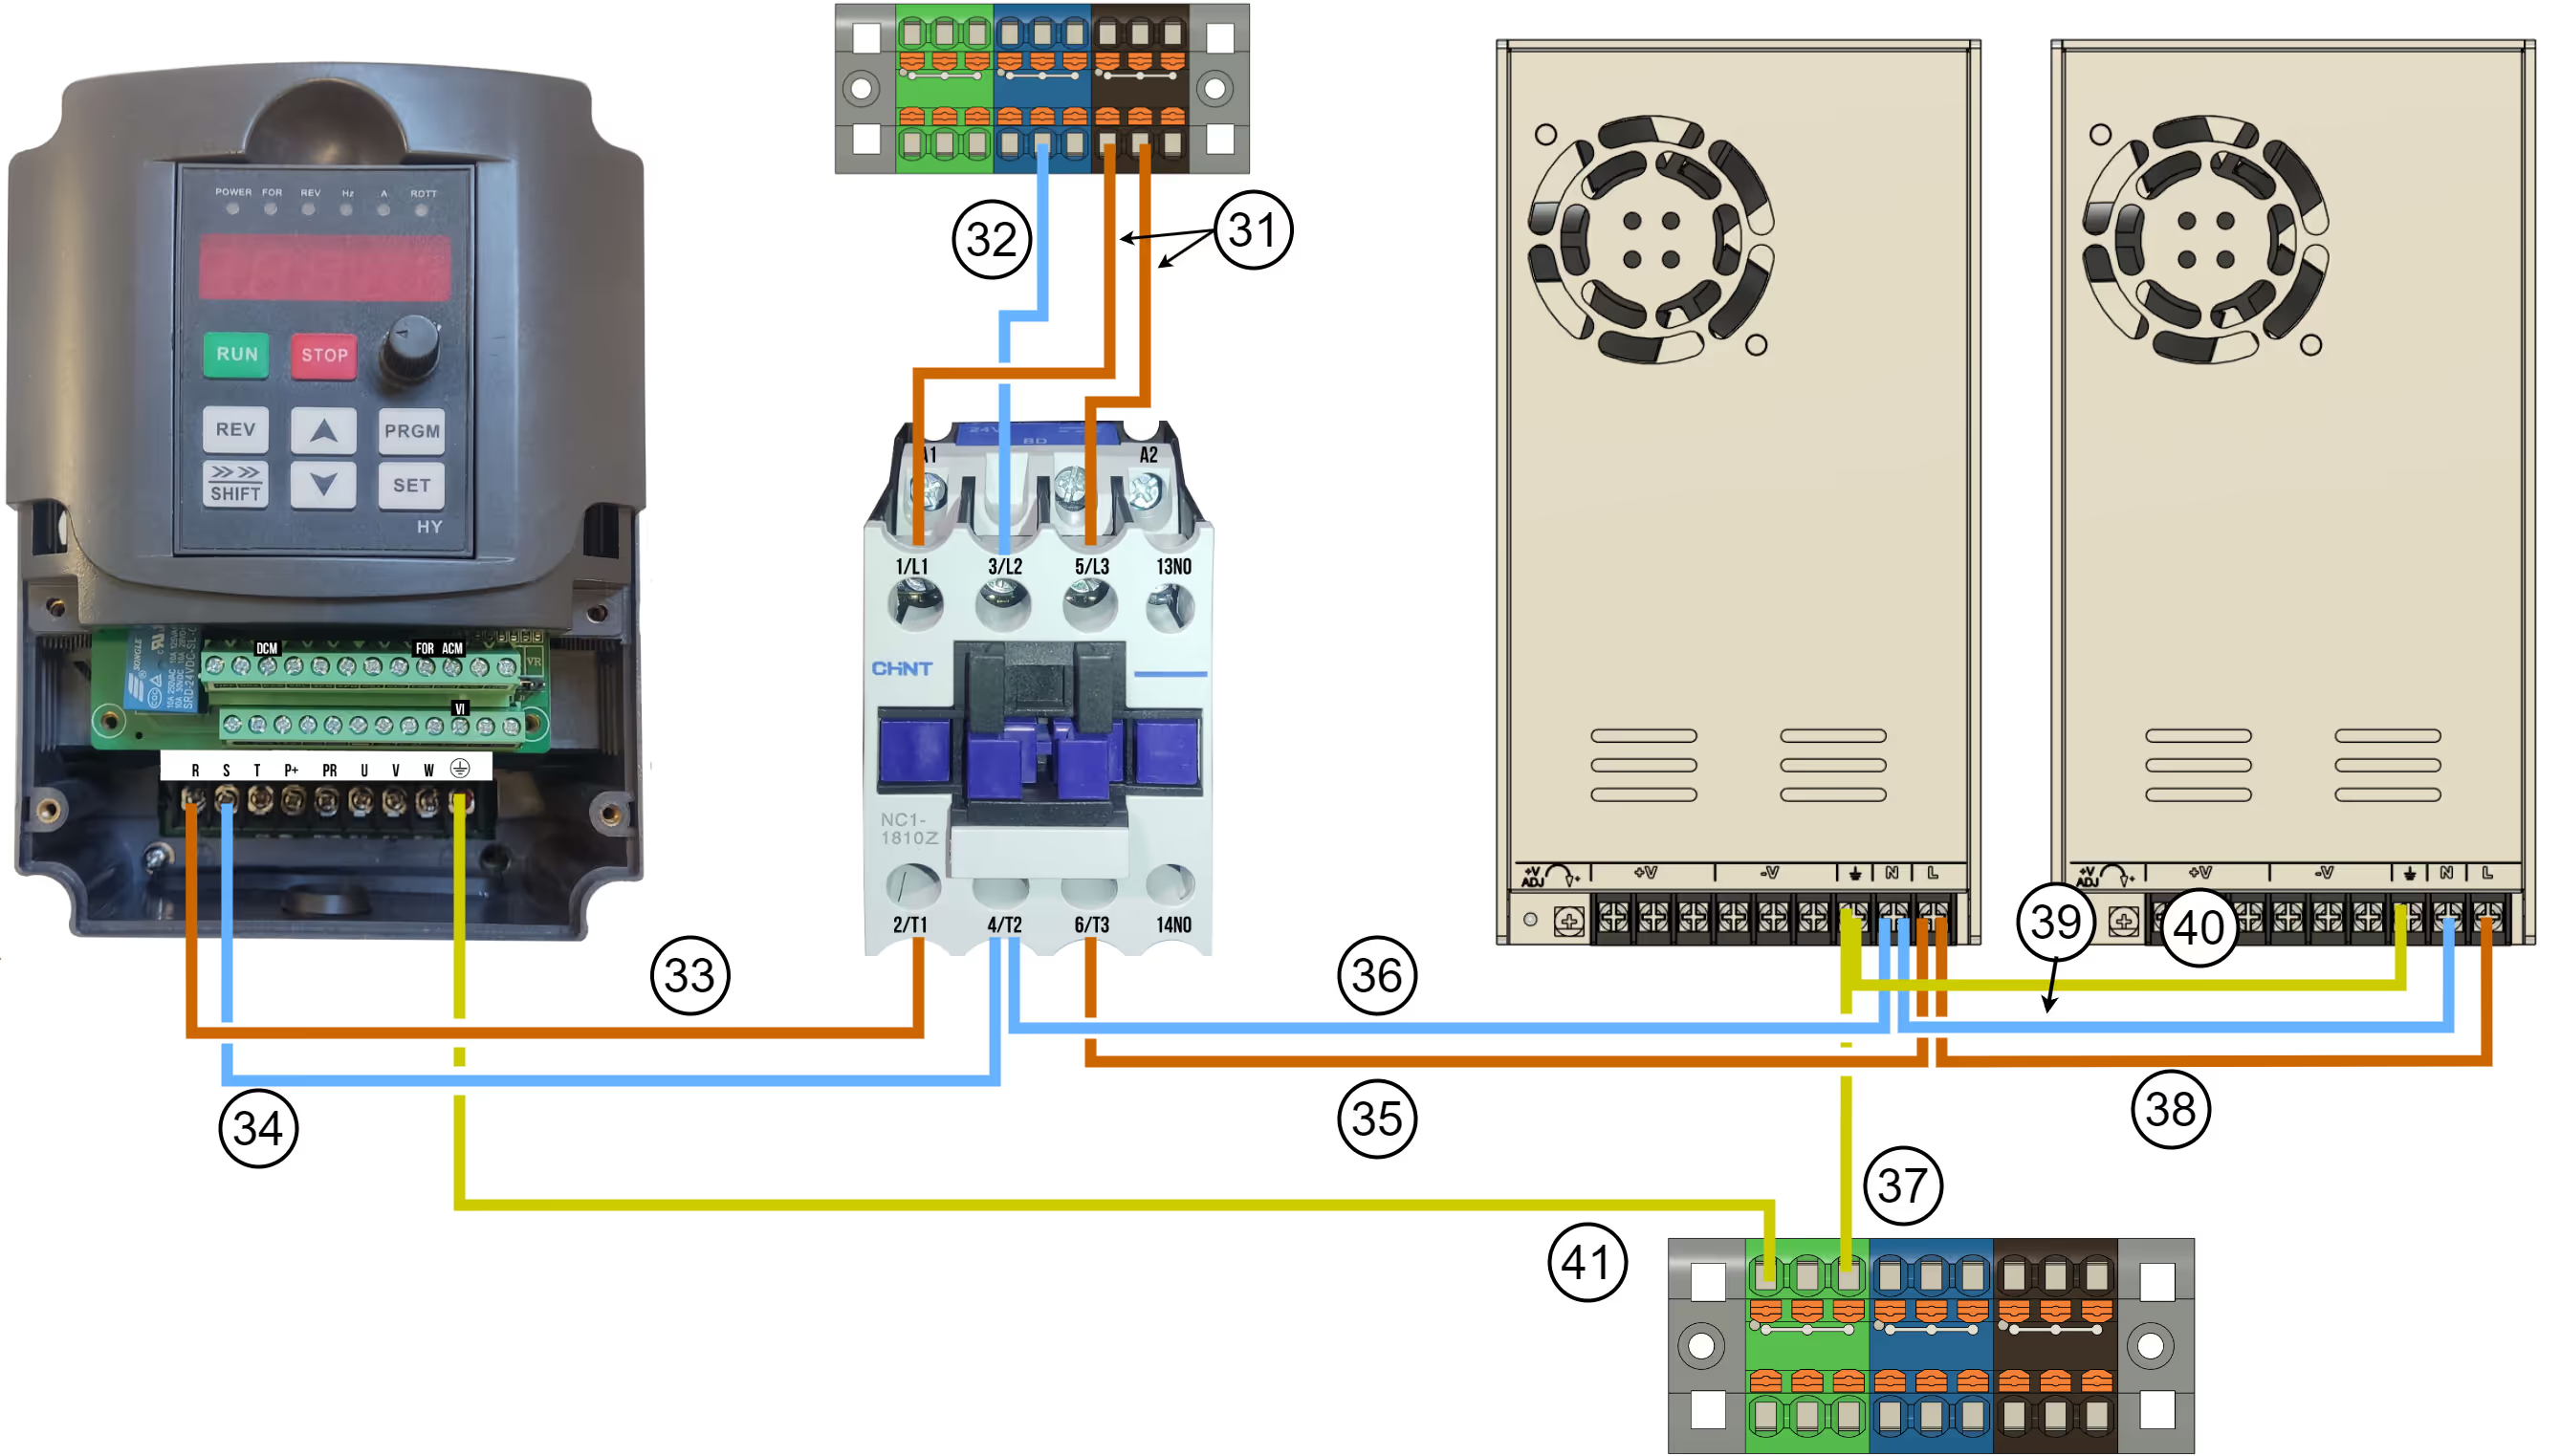
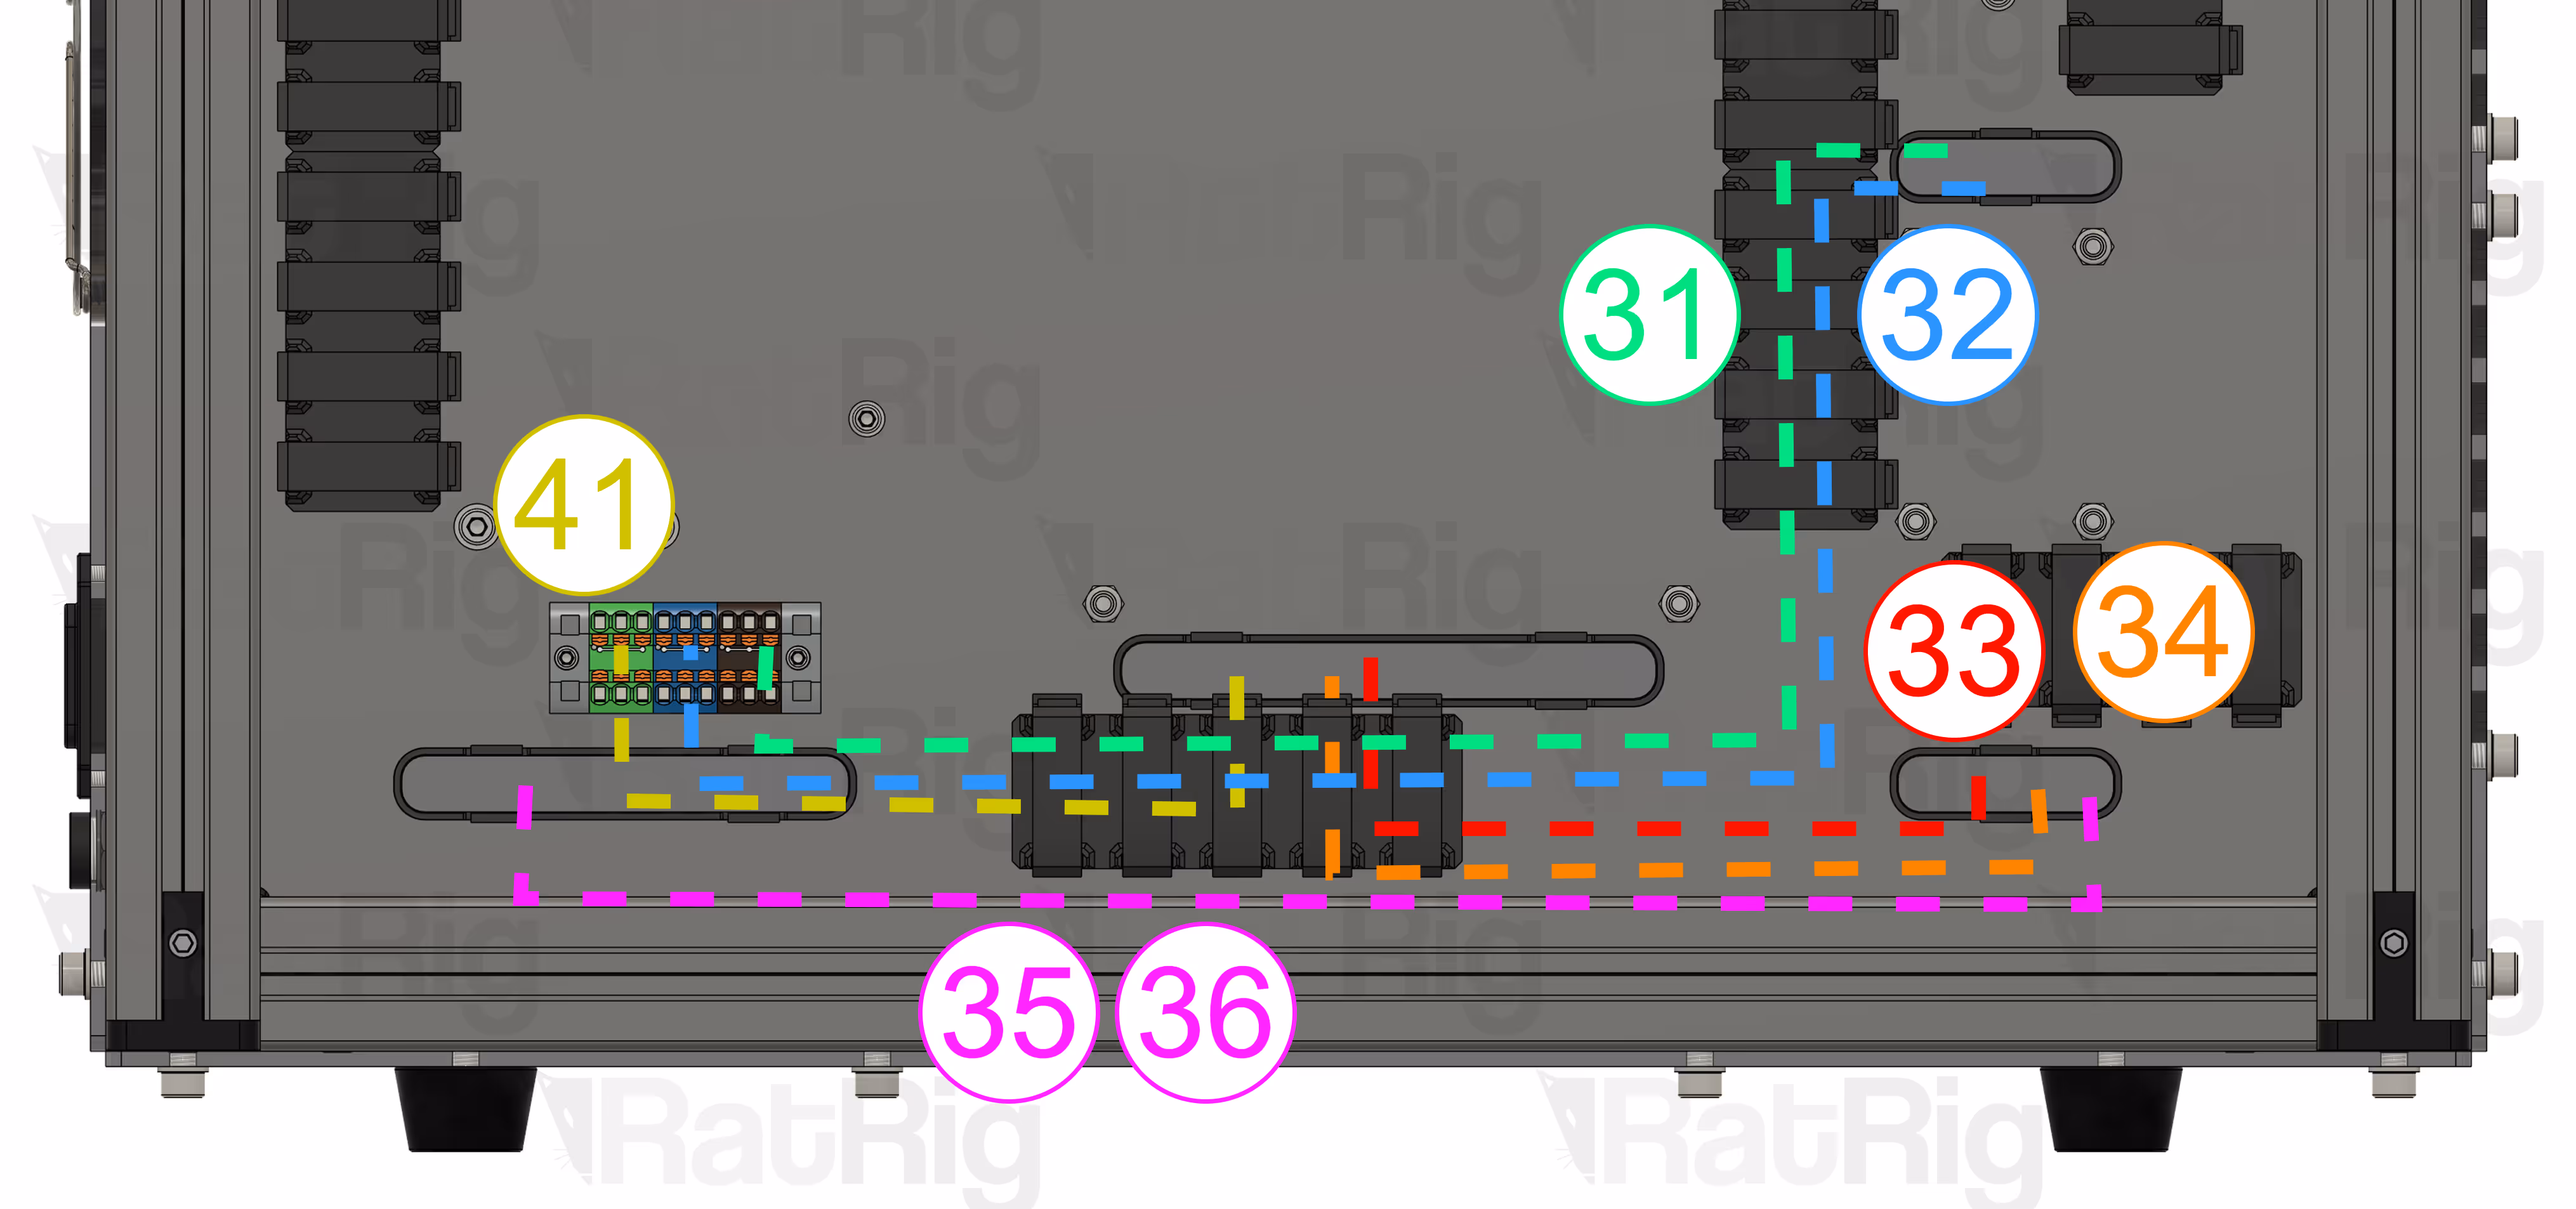
AC Mains Wiring guide

IMPORTANT SAFETY DISCLAIMER CAUTION: ELECTRICAL HAZARD
Before attempting the installation of AC wiring for the Universal CNC Electronics enclosure, please read and understand the following safety warnings and instructions thoroughly. The installation of AC wiring involves exposure to high-voltage electricity, which can pose serious risks, including electric shock, fires, and potentially fatal injuries. This task should only be performed by individuals with appropriate electrical qualifications and experience. By proceeding with the wiring installation, you acknowledge and agree that:
‍
‍Expertise Required: Installation should be executed by a professional or by an individual knowledgeable and experienced in electrical systems. Improper handling or connection of electrical components can result in significant personal injury or property damage.

‍Compliance with Local Laws and Regulations: It is your responsibility to ensure that all wiring and electrical work complies with local, state, and national electrical codes and regulations.

‍Personal Responsibility: You assume all responsibility and risk associated with the installation of AC wiring. Rat Rig provides these instructions as a guide only and does not imply or express warranty or support for improper installation.

‍Limitation of Liability: Rat Rig shall not be liable for any claims, injuries, damages, or losses resulting from incorrect installation or handling of AC electrical components. Your decision to perform this installation signifies your acceptance of this risk.

If you are unsure about performing this installation safely and correctly, we strongly advise you to contact a licensed electrician to complete this task. Ensure all power sources are disconnected before beginning installation and follow all safety precautions.

I understand the risks

CLICK HERE FOR - Intermediate wiring Bundle

Advanced wiring bundle - available by the end of march

Electronics - Intermediate bundle

Universal CNC Electronics enclosure

This page contains the necessary information to wire the AC circuit of the Universal CNC Electronics Enclosure. Always double-check every connection and wiring diagram.

⚠️WARNING!

Before beginning this guide, ensure that the machine is powered off and disconnected from the mains outlet.

Before getting started - How to crimp

Ensuring good crimps on 230V/110V circuits is critical for both safety and performance. Crimps provide a secure and stable connection between electrical wires and terminals, essential in preventing loose connections that can lead to overheating, short circuits, or electrical fires. A properly executed crimp ensures low resistance and high conductivity, which is crucial for maintaining the efficiency and reliability of the electrical system.

It is essential to use the appropriate tools when crimping connectors. Poorly executed crimps can damage electronic components, create fire hazards, and pose a risk of injury! Below are three examples of suitable crimping tools for the task. Various models are available, and some are designed to crimp multiple types of connectors using a single tool.

Tip:
When crimping a spade connector, remember to insert the silicone cover onto the wire before performing the crimp.

⚠️WARNING!

Never connect the power cord to the IEC without finishing all connections and installing the AC cover. Triple-check all connections, as a misplaced wire can cause serious damage and injurie.

Install the mains power wires

Prepare the following wires:
100mm - 18AWG Brown (A-Spade, B-Spade) (15)
280mm - 18AWG Brown (A-Spade, B-Ferrule) (16)
280mm - 18AWG Blue (A-Spade, B-Ferrule) (17)
280mm - 18AWG YellowGreen (A-Spade, B-Ferrule) (18)

Wires 12, 13 and 14 should have been installed here.

Wire the components as shown below, ferrules for the PTFix blocks, and spade connectors for the IEC and fuse holder.
‍

Pull on the cables to verify if all connectors are secure!

Connect the VFD+spindle

Prepare the following wires:
400mm - 18AWG Brown (A-Fork, B-Fork) (22)
400mm - 18AWG Blue (A-Fork, B-Fork) (23)
600mm - 18AWG Brown (A-Fork, B-Ferrule) (24)
600mm - 18AWG Blue (A-Fork, B-Ferrule) (25)
350mm - 18AWG YellowGreen (A-Fork, B-Ferrule) (26)

Wire the components as shown below, using the fork terminals for the Contactor and VFD, and the ferrules for the PTFix Blocks.
‍
Pull on the cables to verify if all connectors are secure!

Route the wires as shown:

⚠️ Before powering ON

Before powering on, ensure all connections are secure, properly crimped, and correctly wired according to the diagram. Additionally, verify that the color scheme is followed accurately to maintain consistency and safety.

Proceed to the next guide

Electronics - Advanced bundle

Universal CNC Electronics enclosure

This page contains the necessary information to wire the AC circuit of the Universal CNC Electronics Enclosure. Always double-check every connection and wiring diagram.

⚠️WARNING!

Before beginning this guide, ensure that the machine is powered off and disconnected from the mains outlet.

Before getting started - How to crimp

Ensuring good crimps on 230V/110V circuits is critical for both safety and performance. Crimps provide a secure and stable connection between electrical wires and terminals, essential in preventing loose connections that can lead to overheating, short circuits, or electrical fires. A properly executed crimp ensures low resistance and high conductivity, which is crucial for maintaining the efficiency and reliability of the electrical system.

It is essential to use the appropriate tools when crimping connectors. Poorly executed crimps can damage electronic components, create fire hazards, and pose a risk of injury! Below are three examples of suitable crimping tools for the task. Various models are available, and some are designed to crimp multiple types of connectors using a single tool.

Tip:
When crimping a spade connector, remember to insert the silicone cover onto the wire before performing the crimp.

⚠️WARNING!

Never connect the power cord to the IEC without finishing all connections and installing the AC cover. Triple-check all connections, as a misplaced wire can cause serious damage and injurie.

Install the mains power wires

Prepare the following wires:
280mm - 18AWG Brown (A-Spade, B-Ferrule) (27)
100mm - 18AWG Brown (A-Spade, B-Spade) (28)
280mm - 18AWG Blue (A-Spade, B-Ferrule) (29)
280mm - 18AWG YellowGreen (A-Spade, B-Ferrule) (30)

Wires 21, 22, 23, 24, 25 26 should have been installed here.

Wire the components as shown below, ferrules for the PTFix blocks, and spade connectors for the IEC and fuse holder.
‍

Pull on the cables to verify if all connectors are secure!

Route wires 21, 22, 23 as shown:

Connect the VFD+spindle

Prepare the following wires:
2x 600mm - 18AWG Brown (A-Fork, B-Ferrule) (31)
600mm - 18AWG Blue (A-Fork, B-Ferrule) (32)
400mm - 18AWG Brown (A-Fork, B-Fork) (33)
400mm - 18AWG Blue (A-Fork, B-Fork) (34)
500mm - 18AWG YELLOWGREEN (A-Fork, B-fork) (41)
Wires 35, 36, 37 ,38, 39, 40  should have been installed here.
‍
Wire the components as shown below, using the fork terminals for the Contactor and VFD, and the ferrules for the PTFix Blocks.
‍
Pull on the cables to verify if all connectors are secure!

Route the wires as shown:

⚠️ Before powering ON

Before powering on, ensure all connections are secure, properly crimped, and correctly wired according to the diagram. Additionally, verify that the color scheme is followed accurately to maintain consistency and safety.

Proceed to the next guide