V-Core 4.0 - IDEX
Configuration
Prepare RatOs
01. Download RatOS by clicking the button below. Alternatively it can be downloaded from GitHub (look for the RatOS-*.img.xz file under the Assets dropdown).
02. Use a tool like SDcard Formatter to prepare the SD card before flashing.
03. Write the image to a 16GB or larger SD card using Balena Etcher.
01. Network connectivity
- Insert the flashed SD card into the Raspberry Pi and power on the machine.
- Wait for the RatOS hotspot to appear on your control device (computer, tablet, or smartphone). This may take a few minutes, as the Raspberry Pi is flashing the new firmware.2.1. If the RatOS hotspot asks for a password, it is: "raspberry"
- Connect to the hotspot and access the machine via a web browser at ratos.local.
- On the dashboard, there will be an error, ignore it. It's only klipper complaining that there is no configuration.
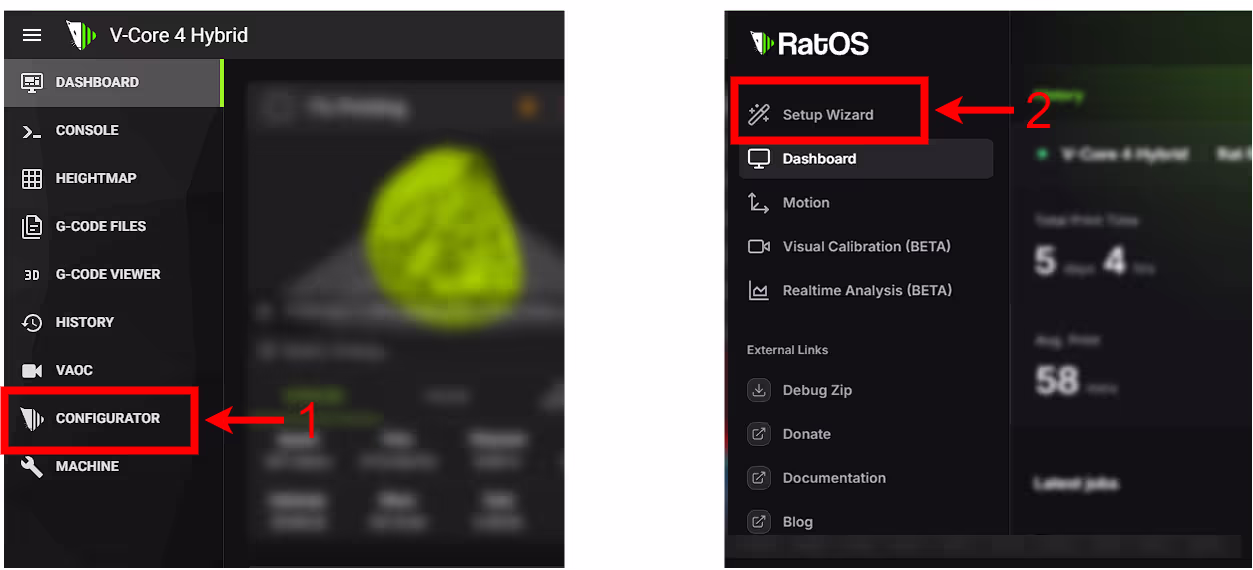
- Open the Configurator (1) from the left-side menu and click on Setup Wizard (2).
- Select your Wi-Fi network (3), enter the password (4), and click "Submit" (5).6.1. If your Wi-Fi is not showing, click “Show Hidden Access Points” or simply reboot the machine.
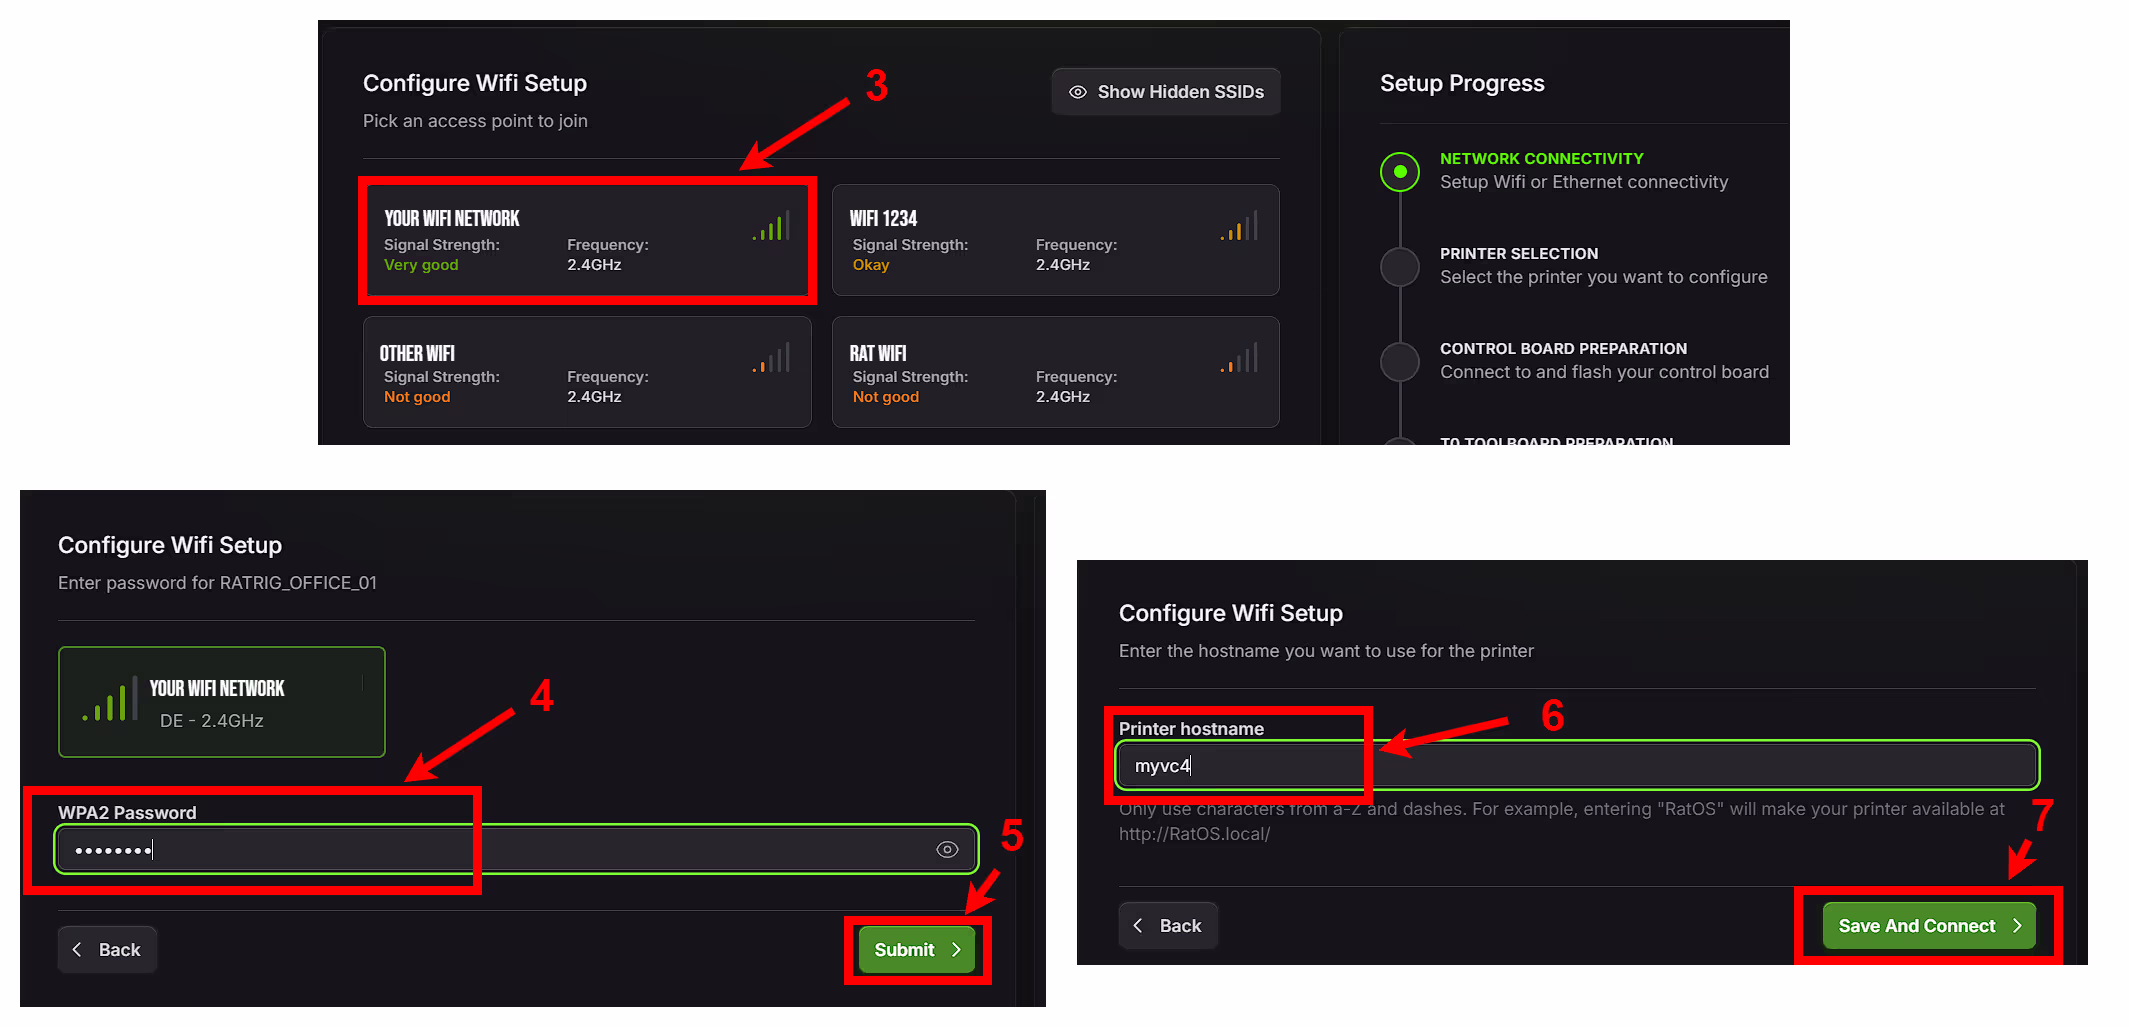
- Choose your printer hostname (e.g. myvc4) (6), then click "Save and Connect" (7).
Some browsers may not have localhost domains acces enabled, if you have trouble connecting to "ratos.local", ensure your browser allows connection to a localhost domain.
02. Updates
- The machine will reboot after the Wi-Fi setup.
- Connect your control device (computer, tablet, or smartphone) to the same Wi-Fi network as your V-Core 4.
- Enter the hostname (e.g., myvc4.local) in your web browser.
- Navigate to 'Machine' (8) in the left-side menu.
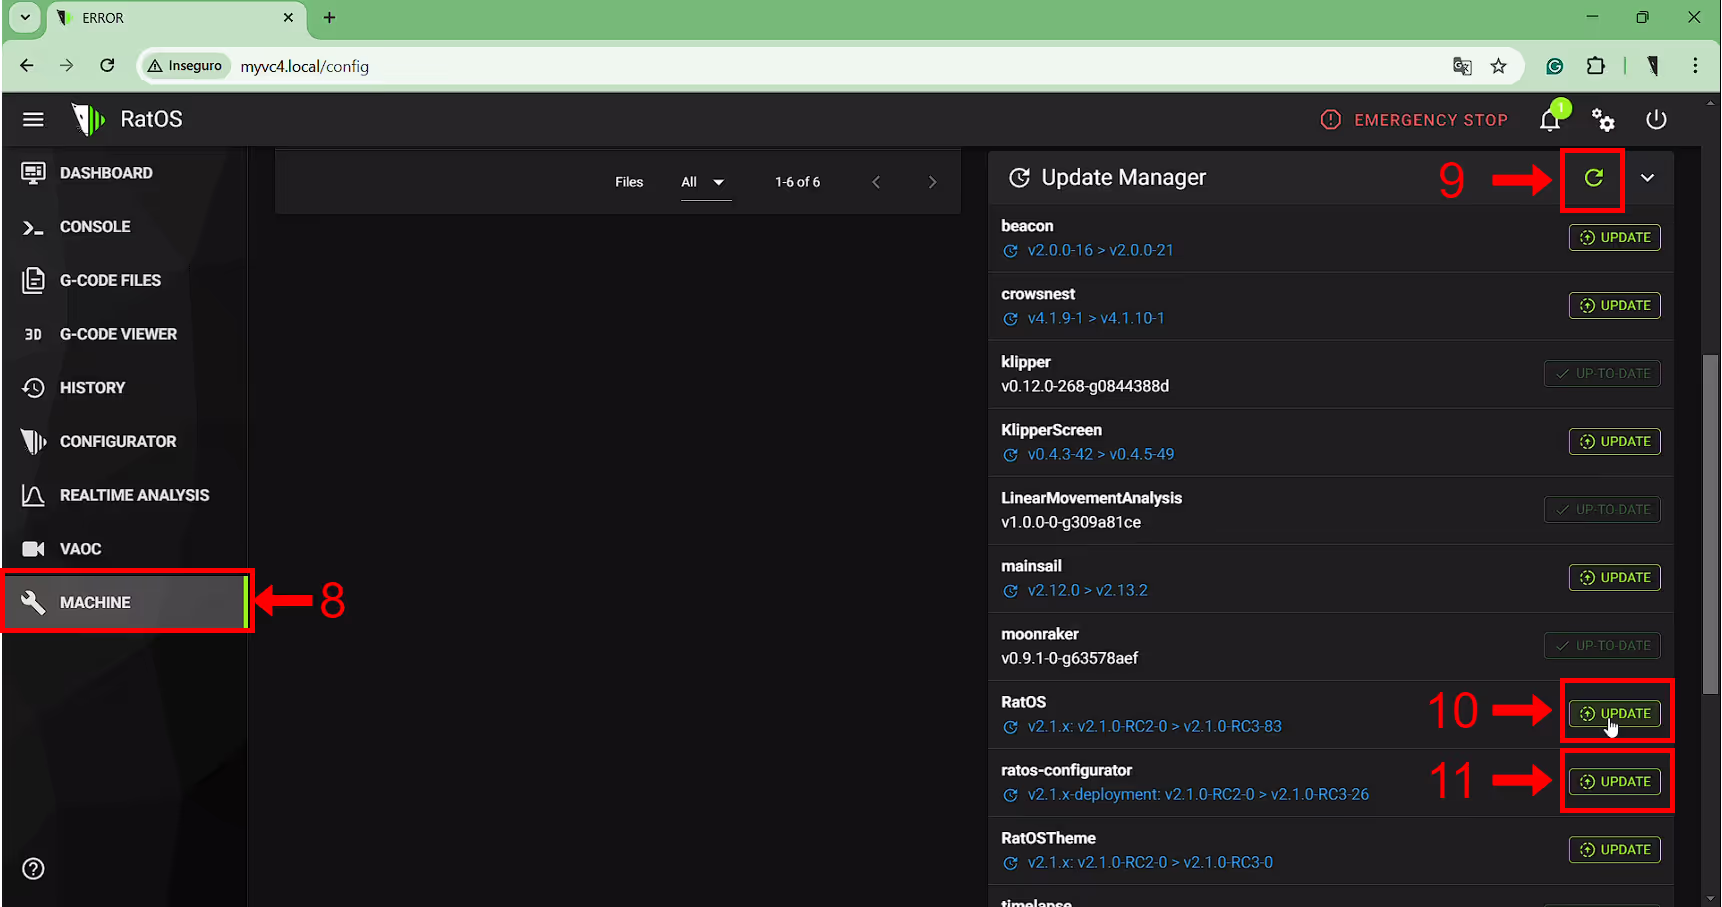
- Locate the update window and refresh it (9);
Please note: The options may take some time to appear - Update RatOS packages by clicking the Update button (10) to prepare for third-party software changes. Wait for the machine to reboot, meaning the installation was successful. Refresh the webpage (press F5)
- Update the 'RatOS-Configurator' packages (11). Wait for the machine to reboot, meaning the installation was successful. Refresh the webpage (press F5)
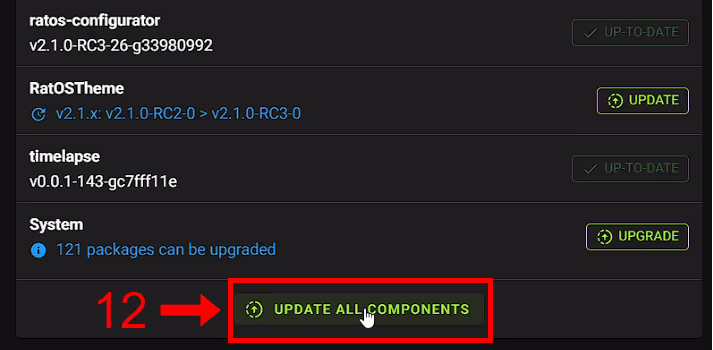
- Click 'Update All Components' (12) at the bottom of the updater panel. Wait for the machine to reboot, meaning the instalation was successful. Refresh the webpage (press F5)
If any of the packages appear "invalid" just refresh the browser page, it may be loading.
03. initial configuration
This chapter covers the VAOC configuration and the initial steps for setting up and operating the IDEX machine. We are working on automating this process.
- On the left-side menu, click "Configurator" (1), then "Setup Wizard" (2).
- In the Menu (3), choose Printer Selection and then choose the IDEX(4) variant that matches your machine's size.

Follow the rest of the configurator to choose and flash your controller and toolboard, as well as select the appropriate hardware. During the configurator process, the standard V-Core 4.0 components are pre-selected. Unless your machine is not a standard kit, you should not need to change any parameters.
04. Configure the Z Endstop & VAOC LED
- On the left-side menu, click "Machine" (1), and then open the "printer.cfg" (2) file.

- Copy and paste the code lines below into the printer.cfg file. Be sure to place them at the end of the file, but before the SAVE_CONFIG section.Warning!Any modifications made below this line will be overwritten, which could result in an incorrect configuration.

[z_offset_probe] pin: ^PG10 # probe trigger pin z_offset: -7 # probe height, used to limit the probe z-move y_offset: 0 # probe y-offset, measured from the camera centre x_offset: 37.5 # probe x-offset, measured from the camera centre speed: 10 # probe speed samples: 3 # number of samples sample_retract_dist: 5 lift_speed: 10.0 samples_result: median samples_tolerance: 0.2 samples_tolerance_retries: 5 [neopixel vaoc_led] pin: PB0 chain_count: 6 color_order: GRB [heater_fan vaoc_fan] pin: PD13 heater: heater_bed fan_speed: 1.0 heater_temp: 50 - Click the "SAVE & RESTART" button on the top right of the window. The machine will then restart with the new parameters applied.
05. Configure the VAOC camera
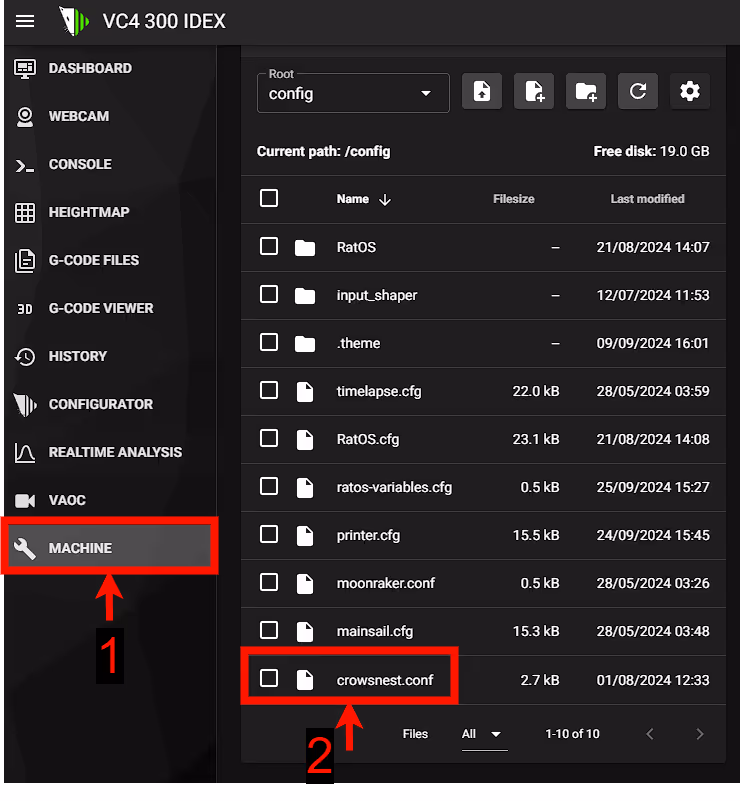
On the left-side menu, click "Machine" (1), and then open the "crowsnest.conf” (2) file.

Replace the [crowsnest] section and the [cam 1] section with the code below:
[crowsnest] log_path: /home/pi/printer_data/logs/crowsnest.log log_level: verbose delete_log: false no_proxy: false [cam 1] mode: camera-streamer enable_rtsp: false rtsp_port: 8554 port: 8080 device: /dev/video0 resolution: 1920x1080 max_fps: 30Click the "SAVE & RESTART" button on the top right of the window. The machine will then restart with the new parameters applied.
Open the VAOC tab on the left menu to check if there is an image being shown.

HELP. VAOC interface shows no image.